Dryer Start Switch Not Working? 9 Easy Ways to Diagnose & Fix It
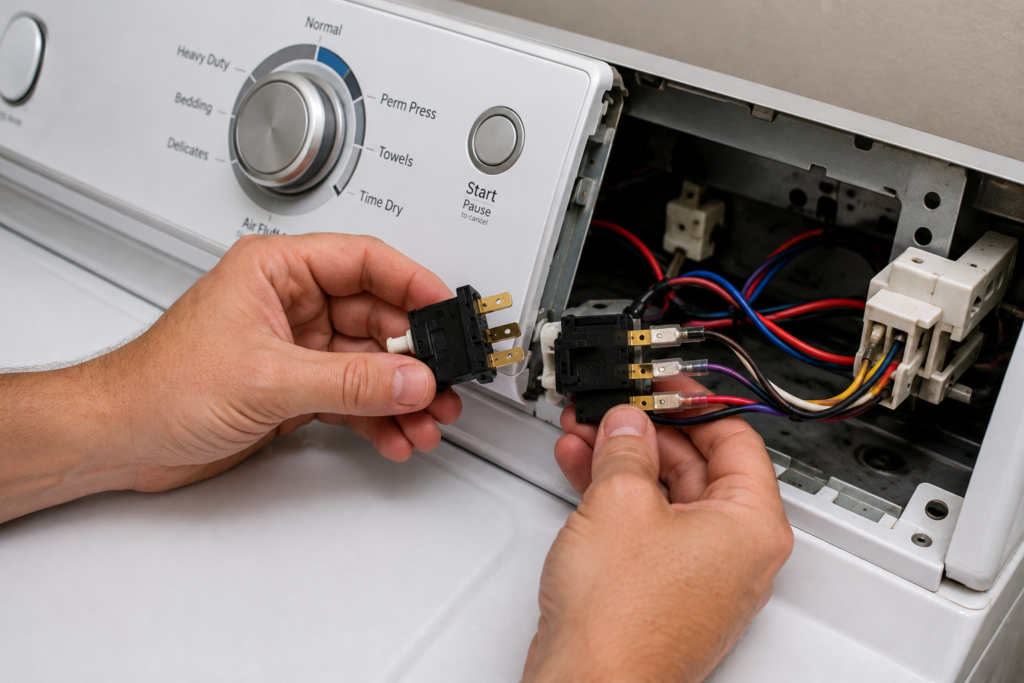
Dryer Start Switch Not Working? If your dryer does not respond when you press the Start button, you’re likely dealing with a faulty start switch or another component that prevents the dryer from starting.
When a dryer start switch is not working, the dryer will not respond at all when you press the Start button—no hum, no drum movement, nothing. In most cases, you can diagnose the problem yourself with a few simple checks and a basic multimeter, and the repair is something most homeowners can handle without calling a technician.
That said, several other components can cause the exact same symptoms, so it pays to test before you replace anything. This guide walks you through exactly how to tell whether the start switch is truly at fault, how to test it, and how to replace it safely if it has failed.
Why Is Your Dryer Start Switch Not Working?

The dryer start switch is a small electrical component mounted directly behind the start button on the control panel. When you press that button, the switch briefly completes a circuit that sends a startup signal to the drive motor. The motor then begins spinning the drum and activating the heating system.
What makes this part easy to overlook is just how briefly it operates. Most dryers use a momentary-contact switch. it only needs to be pressed for a fraction of a second to trigger the motor relay. Once the relay engages, other components take over and keep the machine running. When the start switch fails, that tiny first trigger never fires, and the entire startup sequence stops before it even begins.
This is also why the start switch is easy to misdiagnose. The door switch, thermal fuse, and timer all work as part of the same chain. if any one of them fails, the result looks exactly like a bad start switch. Getting the diagnosis right first is what saves you both time and money
Signs Your Dryer Start Switch Is Not Working
Not every symptom points clearly to the start switch, but these are the most common patterns to watch for:
Complete silence when you press start. No hum, no click, no movement of any kind. This total lack of response especially if the display or indicator lights are still on. is one of the strongest indicators of a failed start switch.
The dryer starts sometimes but not every time. If you find yourself pressing the button two or three times, or holding it at a slightly different angle before it catches, the internal electrical contacts inside the switch are likely corroding or breaking down. Intermittent behavior like this almost always gets worse over time.
You hear a mechanical click, but nothing starts. The physical button is working. it clicks and springs back normally. but the electrical contacts inside are no longer making a clean connection when pressed.
The dryer hums but the drum does not move. This symptom can also point to a seized motor or a bad start capacitor, but a start switch that is sending an incomplete signal to the motor relay is a legitimate cause worth checking.
One important note before you go further: A blown thermal fuse, a faulty door switch, and a tripped circuit breaker can all produce symptoms that look identical to a bad start switch. Do not order replacement parts until you have confirmed what is actually failing. the testing section below will show you how.
Quick Troubleshooting Guide
Use this quick checklist before disassembling your dryer. Many startup problems can be solved in just a few minutes.
| Symptom | Check First |
|---|---|
| No response when pressing Start | Power supply, breaker, door switch |
| Button works only sometimes | Start switch wear or loose wiring |
| Display has power but dryer won’t start | Thermal fuse or door switch |
| Motor hums but drum doesn’t move | Drive motor or drum belt |
Why Dryer Start Switches Fail

Understanding what causes start switch failure helps you make a smarter repair decision and, just as importantly, helps you avoid the same problem down the road.
Normal wear over thousands of cycles is the most common reason. Every time you start your dryer, the electrical contacts inside the switch open and close. Over years of regular use, those contacts corrode, pit, and eventually become too unreliable to complete the circuit.
Humidity and moisture are bigger contributors than most people expect. Laundry rooms naturally carry more moisture in the air than the rest of the home, and over time that humidity works its way into the control panel and degrades the metal contacts inside the switch.
Overheating is a cause worth taking seriously. If your dryer has been running hotter than normal. usually due to a clogged exhaust vent or a failing thermostat. that excess heat can warp the plastic housing of the switch and damage its internal contacts. If overheating played a role in your switch failure, address the underlying cause before installing a new part. A replacement switch will not last long if the root problem is still present.
Physical damage is less common but worth checking. Pressing the button repeatedly with excessive force, or any kind of impact to the control panel, can crack the switch housing or break the internal spring mechanism.
And sometimes the answer is simply age. Dryers that are ten or more years old are considerably more likely to have components that have reached the natural end of their service life
How to Diagnose a Dryer Start Switch Not Working
Work through these steps in order. The most common mistake homeowners make is jumping straight to replacing the start switch without ruling out simpler causes first.
Check the Basics Before Opening Anything
These quick checks take about two minutes and occasionally reveal a far simpler problem:
- Power supply — Confirm the dryer is fully plugged in and the outlet is live. Plug something else into the same outlet to verify it is working.
- Circuit breaker — Electric dryers run on a double-pole breaker. If one leg has tripped, the dryer may power its display but lack enough power to run the motor. Open your electrical panel, look for a breaker that is slightly out of alignment with the others, and reset it.
- Door latch — The dryer’s door switch will prevent any start attempt if it senses the door is not fully closed. Push the door firmly shut and listen for the latch to click into place.
- Control Lock or Child Lock — Many modern dryers include a lock feature that disables the control panel. Look for a padlock symbol on the display and refer to your owner’s manual to turn it off, usually by holding a specific button for three to five seconds.
- Cycle selector position — Make sure the timer knob or cycle selector is set to an active drying cycle and is not stuck between positions.
If any of these is the culprit, you have saved yourself a disassembly job entirely.
Inspect the Button Itself
With the dryer unplugged, press the start button a few times and pay close attention to how it feels. A healthy start button presses down smoothly and springs back quickly with a clean response. If it feels mushy, sticky, or fails to spring back the way it should, the mechanism inside may already be damaged.
Also check for lint buildup, dirt, or sticky residue packed around the button. It sounds minor, but debris around the switch can prevent it from pressing down far enough to make full electrical contact. A careful cleaning around the button occasionally solves the problem without any further work
You May Also Like
If your dryer start switch is not working, these related repair guides can help you diagnose other possible causes and fix the problem faster.
Access the Switch Inside the Console

To reach the start switch, you need to open the control panel. Always unplug the dryer from the wall before removing any panels. this is non-negotiable.
The exact process varies by brand and model, but it typically involves removing a few screws from the back of the console, sliding the panel forward, and flipping it upward to expose the wiring behind the controls. Once you have access, the start switch will be located directly behind the start button, connected to the wiring harness by two or more wire connectors.
Test the Switch With a Multimeter
This is the step that gives you a definitive answer. A multimeter set to continuity mode tells you whether electricity can actually flow through the switch the way it is supposed to.
Disconnect the wires from the switch terminals. Place one probe on each terminal and test the switch in both positions:
- Button at rest, not pressed: The meter should show no continuity. This is correct. the switch is designed to be open when idle.
- Button pressed and held: The meter should beep or display a continuity reading, confirming the circuit is closing.
If the switch shows no continuity even when pressed. or shows continuity constantly without being pressed at all. it has failed and needs to be replaced.
How to Fix a Dryer Start Switch Not Working
Replacing a dryer start switch is a manageable DIY repair on most standard machines, including models from Whirlpool, Maytag, Kenmore, GE, Frigidaire, KitchenAid, and Amana. The repair typically takes 30 minutes or less once you have the correct part in hand.
What you will need:
- Replacement start switch (matched to your exact model number)
- Phillips head screwdriver
- 1/4-inch nut driver
- Needle-nose pliers
- Masking tape and a marker for labeling wires
Before you order the part, find your model number. It is printed on a sticker inside the door frame, on the back of the machine, or along the interior drum wall. Ordering by model number ensures you get the exact switch your dryer requires. the wrong part can cause further damage or a wiring mismatch.
Once you have the replacement switch, follow these steps:
- Unplug the dryer from the wall outlet. If it is a gas dryer, also shut off the gas supply valve.
- Pull the control knob straight off the switch stem. it should pull free without tools.
- Remove the back panel screws from the console using a 1/4-inch nut driver, then lift and set the panel aside.
- Label every wire with a small piece of masking tape before disconnecting anything. Write down the terminal position on each piece of tape, and take a photo with your phone as a backup. This step is worth the extra minute. reconnecting wires incorrectly can damage the new switch.
- Disconnect the wire connectors from the switch terminals using needle-nose pliers, pulling gently and straight.
- Release the locking tab on the old switch, rotate it slowly counterclockwise, and pull it free from the console panel.
- Insert the new switch into the same opening, rotate it clockwise until it locks into position, then reconnect each wire exactly as labeled.
- Reattach the back panel, line up the screw holes, and tighten all screws firmly.
- Push the control knob back down onto the new switch stem until it seats securely.
- Restore power and test. Plug the dryer back in, select a cycle, and press start. If the drum begins turning, the repair is complete.
Safety reminder: If you are not fully confident about reconnecting the wires to the correct terminals, stop and have a qualified technician complete that step. Incorrect wiring can damage the new switch, trip a breaker, or in rare cases create a hazard.
Common Mistakes to Avoid
- Replacing the start switch without testing it with a multimeter.
- Forgetting to unplug the dryer before opening the control panel.
- Mixing up the wire connections during installation.
- Ignoring a blown thermal fuse or faulty door switch that can cause identical symptoms.
- Ordering a replacement switch without checking the dryer’s model number.
- Skipping a test run after completing the repair.
What If the Start Switch Passes the Test?
If your continuity test shows the switch is functioning correctly, the problem lies elsewhere. Here are the most likely culprits to check next:
Blown thermal fuse. This safety component is located on the blower housing and is designed to cut power if the dryer overheats. When it blows, the dryer typically will not start at all. Test it for continuity the same way you tested the start switch. no continuity means it needs to be replaced. Keep in mind that a blown fuse is usually a symptom of a clogged vent rather than a problem on its own, so always clear the vent system when replacing this part.
Faulty door switch. If the door switch has failed, the dryer believes the door is still open and will refuse to start. Remove the door switch. typically accessed from under the top panel. and test it with your multimeter.
Drive motor problem. If you hear a consistent hum when you press start but the drum does not move, the motor itself may be struggling or seized. Check for any obstruction in the blower wheel first, then consider having the motor evaluated by a technician.
Main control board failure. On modern electronic dryers, a shorted or damaged control board can prevent the machine from responding to any commands at all. Look for visible burn marks or signs of scorching on the board, but diagnosis and replacement of a control board is generally a job for a professional.
When multiple components are failing at the same time. especially on an older machine. it is worth doing a quick cost comparison. If the total repair estimate climbs past 50% of what a comparable replacement dryer would cost, the smarter financial decision is usually a new appliance rather than continued repairs.
(If you need help diagnosing a blown thermal fuse or a faulty door switch, check out our related guides on those specific repairs.)
How to Prevent a Dryer Start Switch Not Working Again
A dryer start switch not working is often the downstream result of a larger maintenance problem. most commonly, a machine that has been running hotter than it should for months or years. A few consistent habits go a long way toward preventing these kinds of failures:
Clean the lint trap after every single load. A blocked lint path forces the dryer to work harder and run hotter, which accelerates wear on every electrical component in the machine, including the start switch.
Inspect and clean the exhaust vent at least once a year. Restricted airflow is the leading cause of dryer overheating. Pull the dryer out from the wall, disconnect the duct, and use a vacuum or vent cleaning brush to clear out any lint buildup. Also check the exterior vent cap for blockages.
Use a gentle press on the start button. It sounds small, but hammering the button with force each time shortens the life of the internal spring mechanism. A firm, controlled press is all the switch needs.
Ventilate the laundry room. Keeping the space reasonably aired out reduces the humidity that gradually works its way into the control panel and corrodes electrical contacts over time.
None of these habits require more than a few minutes of attention, but together they meaningfully extend the life of your dryer and reduce the likelihood of facing this kind of repair again
When to Call a Technician
While a faulty dryer start switch is usually a DIY-friendly repair, professional assistance is recommended in the following situations:
- The dryer still won’t start after the start switch has been tested or replaced.
- You notice burnt wiring, melted connectors, or a burning smell inside the control panel.
- The electronic control board appears damaged.
- You are uncomfortable using a multimeter or reconnecting electrical wiring.
- Multiple components appear to have failed at the same time.
Calling a qualified appliance technician at this stage can prevent additional damage and ensure the repair is completed safely.
Most dryer start switch not working problems are caused by normal wear, but checking related components like the thermal fuse, door switch, and drive motor can prevent unnecessary repairs. Following a step-by-step diagnosis helps identify the real cause quickly.
The Bottom Line
A dryer start switch not working is frustrating, but in the vast majority of cases it is a fixable problem. one that does not require an expensive service call or a replacement appliance. Start with the quick checks, test before you buy parts, and follow the replacement steps carefully if the switch has truly failed. The whole repair typically costs under $20 in parts and takes less than an hour from start to finish.
And if the diagnosis points somewhere more complex, you will walk away from this process knowing exactly what is wrong. which makes any conversation with a technician faster, more specific, and less expensive.
Your laundry does not have to wait. With a methodical approach, this is a problem most homeowners can solve in an afternoon
Frequently Asked Questions
How do I know if my dryer start switch is bad?
The clearest sign is pressing the start button and getting no response at all. no hum, no movement, nothing. If the dryer starts only sometimes, or only when you hold the button in a specific way, those are signs of an intermittent switch failure. Confirm the diagnosis with a multimeter continuity test before replacing anything.
Can a dryer start switch be cleaned instead of replaced?
Sometimes. If dirt, lint, or oxidation on the button contacts is the only issue, carefully cleaning around the button can restore proper contact. However, if the internal electrical contacts inside the switch have corroded or physically worn down, cleaning will not fix the problem and replacement is the only reliable solution.
How much does it cost to replace a dryer start switch?
The part itself typically costs between $10 and $30 depending on your dryer brand and model. If you do the replacement yourself, that is your total cost. A professional repair visit will add labor charges on top of the part price, usually bringing the total to somewhere between $75 and $150.
Will a dryer start switch work across different brands?
No. Start switches are specific to each brand and often to specific model ranges within a brand. Always order a replacement switch using your exact model number to ensure compatibility.
Is it safe to replace a dryer start switch myself?
Yes, as long as you unplug the dryer before starting, label wires carefully before disconnecting them, and reconnect everything exactly as it was. The repair does not require working with live electricity. If you are unsure about any step. particularly wire reconnection. having a technician complete that step is a reasonable and safe choice
For additional appliance safety information, visit the U.S. Consumer Product Safety Commission (CPSC) .
About the FixAppLab Editorial Team
The FixAppLab Editorial Team publishes practical appliance repair guides designed to help homeowners diagnose and fix common household appliance problems safely. Every article is carefully researched, reviewed for accuracy, and written in simple language so readers can confidently troubleshoot dryers, washing machines, refrigerators, and other home appliances before considering professional service.
Our Mission: To provide accurate, practical, and easy-to-follow appliance repair information that helps homeowners save time, reduce unnecessary repair costs, and make informed decisions when troubleshooting appliance problems.


Comments